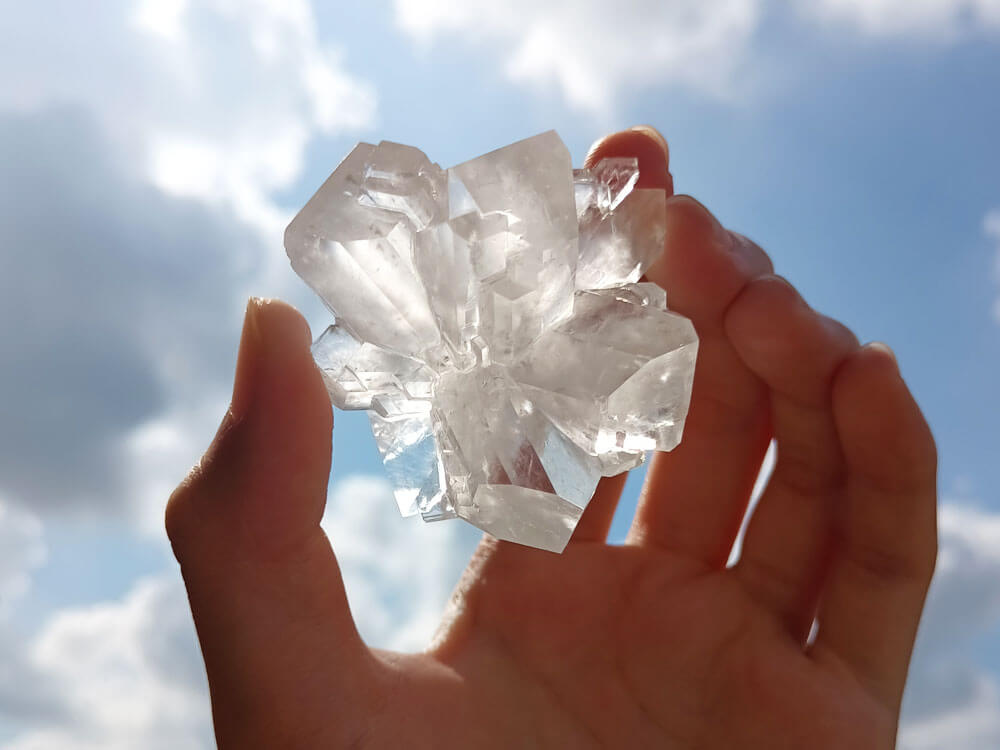
Did you know that you can grow transparent sugar crystals at home?
Hi! I’m Chase, a university student who’s been growing crystals at home for 3 years now. I’ve grown crystals from table salt, Epsom salt, fertilizer, and crystallized other colorful chemical compounds I made myself.
It’s a wonderful hobby, and I’m still amazed at just how many household materials you can make crystals from.
In this guide, I’ll share my procedure on how to grow sugar crystals. Most recipes online only teach you how to make rock candy, but you can do much, much more.
The article will be split into 3 parts:
- Part 1: How to make rock candy
- Part 2: How to grow chunky sugar crystals
- Part 3: How to grow a transparent single crystal
The idea is simple. Hot water can dissolve more sugar than cold water. What we want to do is to dissolve a huge amount of sugar in hot water. Then, once the solution cools down, the excess sugar is forced to “come back out”, and forms sugar crystals in the process.
All 3 parts use the same principle to grow crystals, but in each part, we tweak the procedure to make the sugar crystals grow in different ways.
Let’s get started.
 How to grow sugar crystals
Materials
To grow sugar crystals, you’ll need:
- 6 cups of table sugar
- 2 cups of water
- A pot to dissolve the sugar
- A spoon
- A large jar
- Some wooden skewers
- Nylon fishing line
- A flat dish
Part 1: How to make rock candy
 This is the easiest experiment to attempt. It’s a perfect activity for kids to make their own snack, because it’s very straightforward and gives results fast.
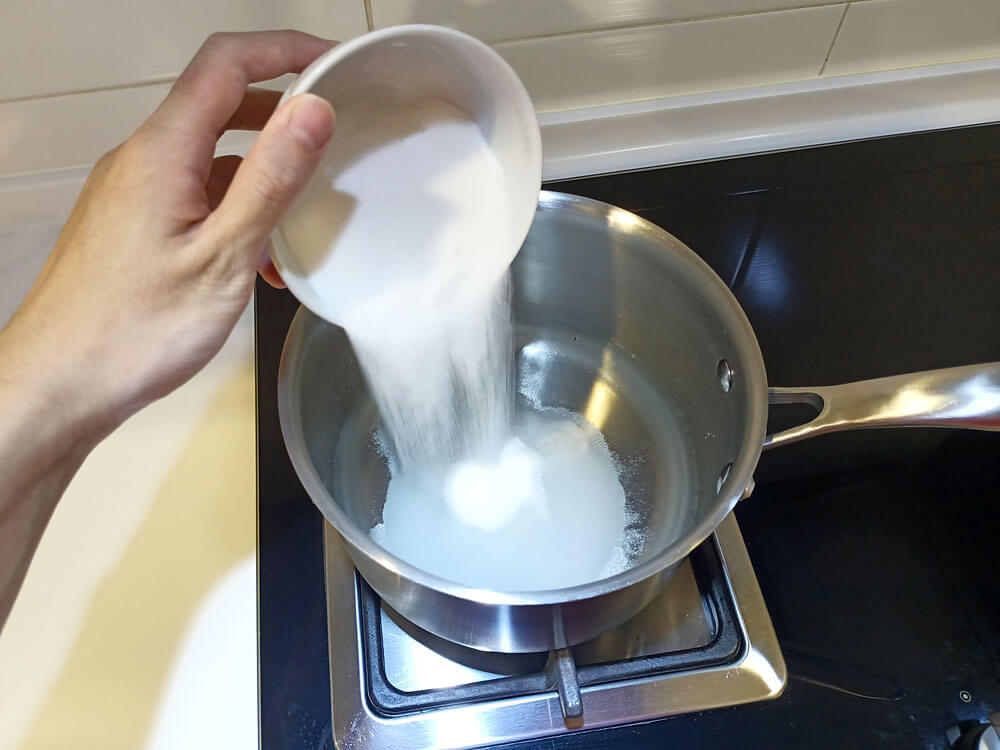
To start, get ready with 1 kg of fine white sugar. Coarse sugar also works, but fine sugar is better because it dissolves faster in water.
To your pot, add 3 cups of sugar per cup of water. Close the lid and heat the mixture until all the sugar dissolves. Stir the solution occasionally to speed up the process.
 Initially, the solution will be cloudy. It should take no more than 10 minutes for it to clear up.
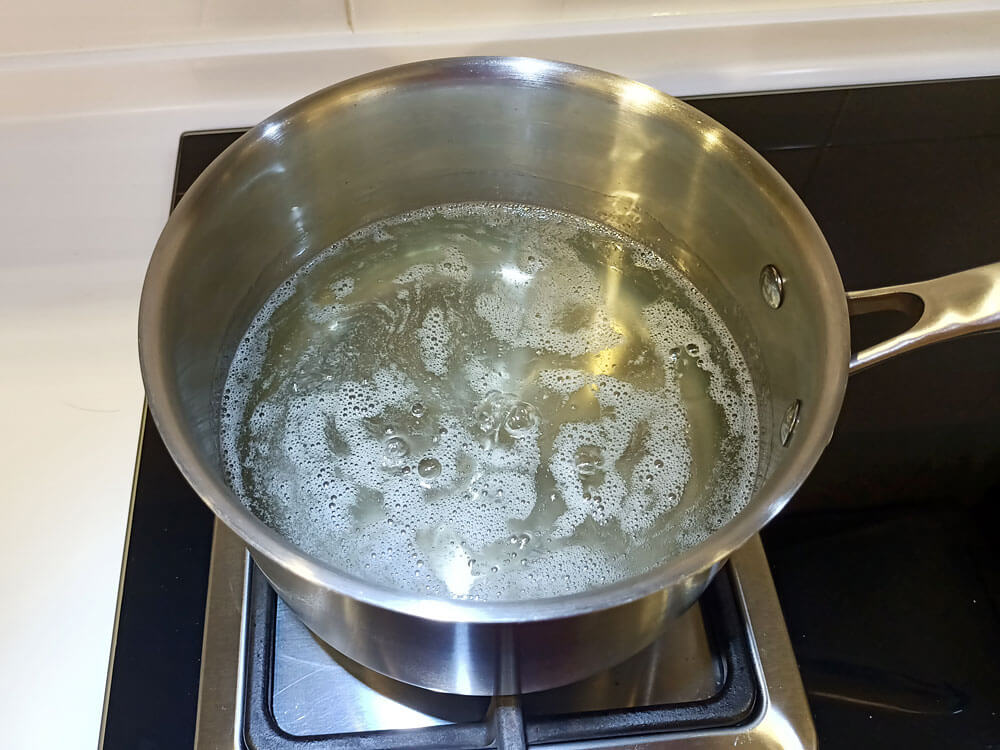 The solution has cleared up after 10 minutes.
When this happens, turn off the heat immediately to prevent the sugar from caramelizing. Then, cover the lid of the pot and let the pale yellow sugar solution cool to room temperature. It’s very important that you cover the lid of the pot, or else sugar crust will form on the surface of the solution as it cools.
When the solution has cooled completely, pour it into a large jar.
 At this stage, you can choose to add food coloring and/or flavoring. Just add a few drops and mix it evenly with a spoon.
Next, dip a wooden skewer into the sticky sugar syrup. After that, take it out, and sprinkle some sugar grains onto the skewer until it is evenly coated.
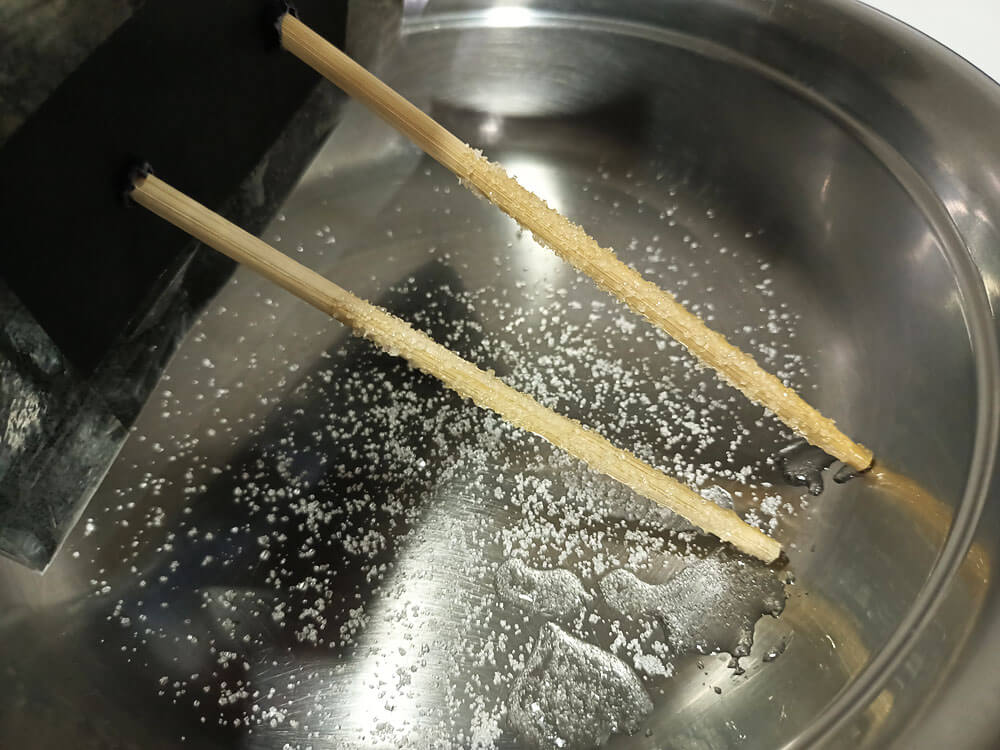 Sugar grains are actually very small sugar crystals. The crystals that you sprinkle onto the skewer will act as seeds that grow into bigger sugar crystals.
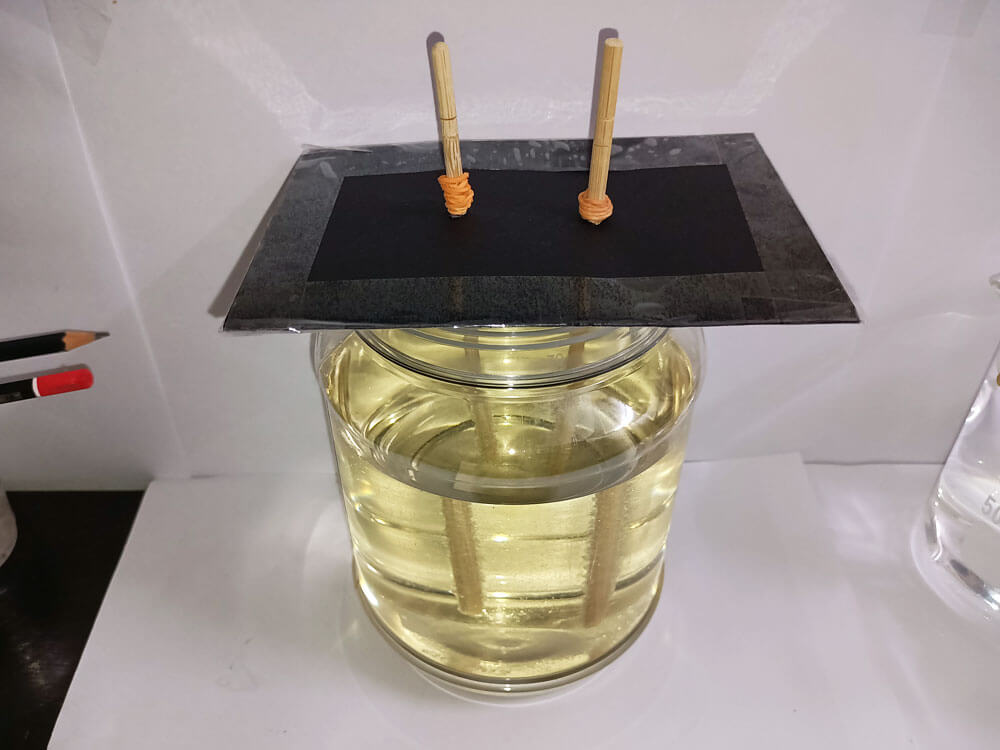
Now, dip the sugar coated skewer back into the solution. You can either suspend it using some clips, poke some holes in a piece of cardboard to hold the skewer in place, or any other method you like. Just make sure that the tip of the skewer is at least 1 inch from the bottom.
This is what my setup looks like:
 Leave it overnight.
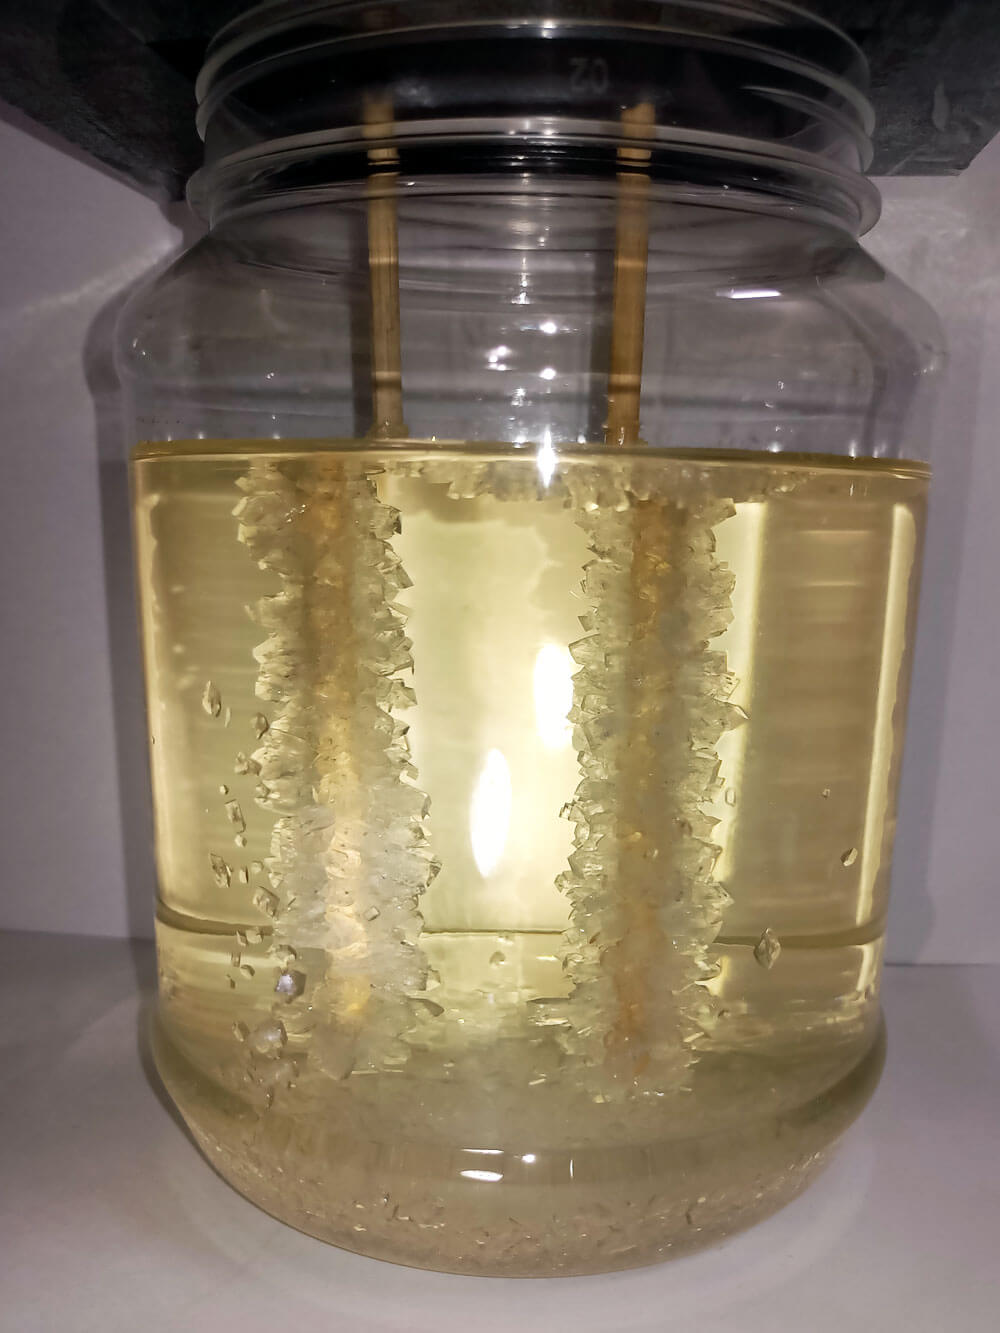
The next day, a nice layer of sugar crystals will have formed on the skewers.
 If you think they’re not big enough, just leave them inside for several more days.
By the 3rd day, my crystals had formed a nice, thick coating.
 Remove the skewers from the solution, soak up the sugar solution on the crystals using a paper towel, and wipe them dry. And that’s it. You’ve successfully made rock candy!
Part 2: How to grow chunky sugar crystals
Maybe the crystals on rock candy aren’t big enough for you. Or maybe you’re a mineral enthusiast and you want more natural looking crystals. In this section, we’ll grow crystals like this:
To begin, prepare the sugar solution using the exact same procedure as above. After it has cooled, pour 50 mL of the syrup into a dish, while keeping the rest in a jar.
 Sprinkle a few grains of sugar directly into the dish. Then, cut 20 cm of nylon fishing line, and tape one end of it onto stick. Poke the other end of the line into a dish.
The purpose of this step is to induce sugar crystals to form, and encourage a few of them to stick to the fishing line. Unlike the procedure for making rock candy, we don’t need the entire line to be coated with crystals – just one or two will do.
Leave the dish overnight, and this is what it looks like the next day:
 Look at how a small cluster of sugar crystals have started growing on the fishing line.
Now, remove the fishing line from the dish, and suspend it (together with the crystals stuck onto the line) in the jar of sugar solution that you prepared previously.
 Partially cover the top of the jar with some plastic wrap. This will prevent sugar crust from forming on the surface of the solution.
Place the setup somewhere nice and shady, and wait for the crystal to grow big!
This is what it looks like after a week:
 You might also notice some wavy, distorted lines rising like heat waves from the top of the sugar crystal (see picture above). This is a sign that the crystal is growing rapidly. The effect is due to the deposition of excess sugar from the highly concentrated solution onto the crystal, causing the solution to become less dense and rise to the top.
At this point you can just sit back and relax.
When you think the crystal is big enough, take it out and dry it with a paper towel. Congrats, you’ve now got a huge chunky sugar crystal.
 Very nice.
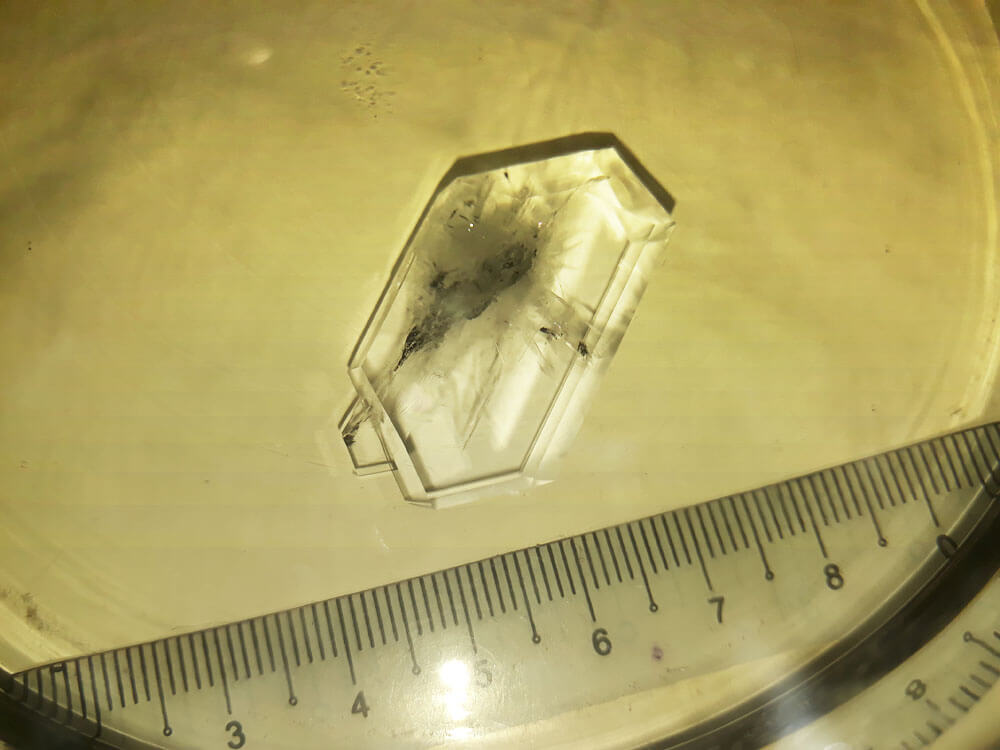
Part 3: How to grow a transparent single crystal
Let’s take it one step further.
It’s time for us to grow sugar crystals that look like gems.
 In Part 2, recall that we poked the fishing line into the dish to let crystals form on it. Sometimes, if you’re very lucky, a single, perfect crystal will form on the fishing line.
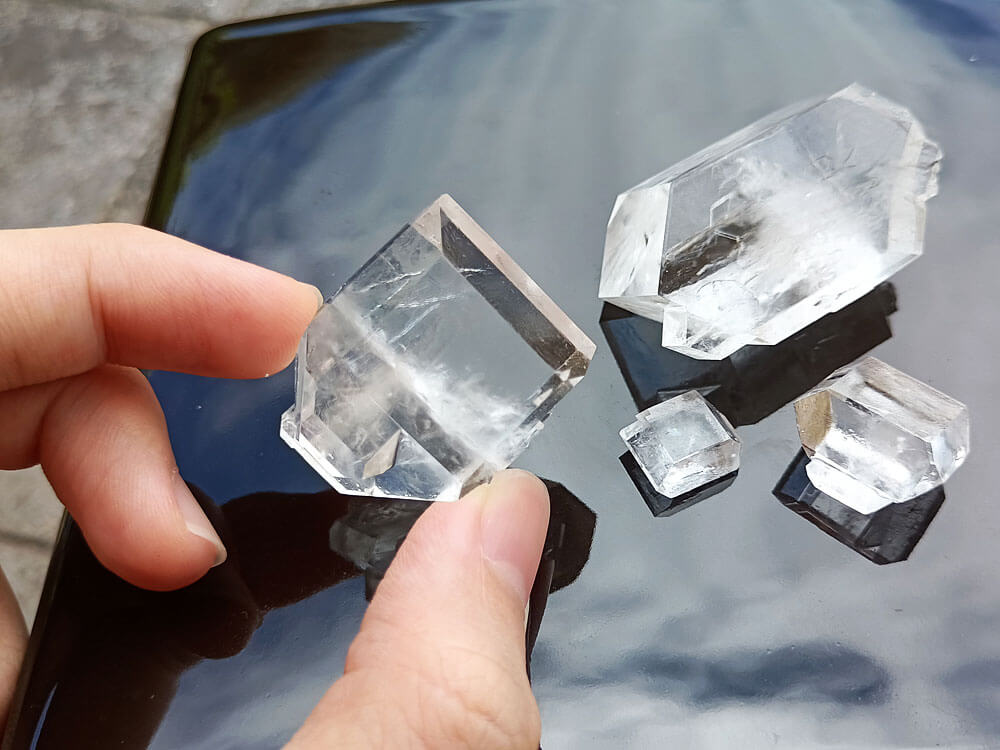
Then, if you follow the previous procedure and suspend it in the sugar solution, it will grow into a nice, transparent single crystal:
 However, it’s not always easy to ensure that just one crystal forms on the string. Most of the time you’ll get a bunch of them stuck together (like the one pictured in Part 2).
Since sugar crystals also like to form at the bottom of the container, you might be tempted to pick out a sugar crystal and tie it to a string. Indeed, most of the time, this is the standard procedure crystal growing procedure.
 Clear sugar crystals like to form in the dish. Don’t be tempted to move or take them out. Touching them will cause sugar dust to form.
However, it will not work for growing sugar crystals. This is because the sugar solution is extremely supersaturated. If we so much as touch any crystal, we will chip it, releasing thousands of tiny particles into the solution, forming crystal dust.
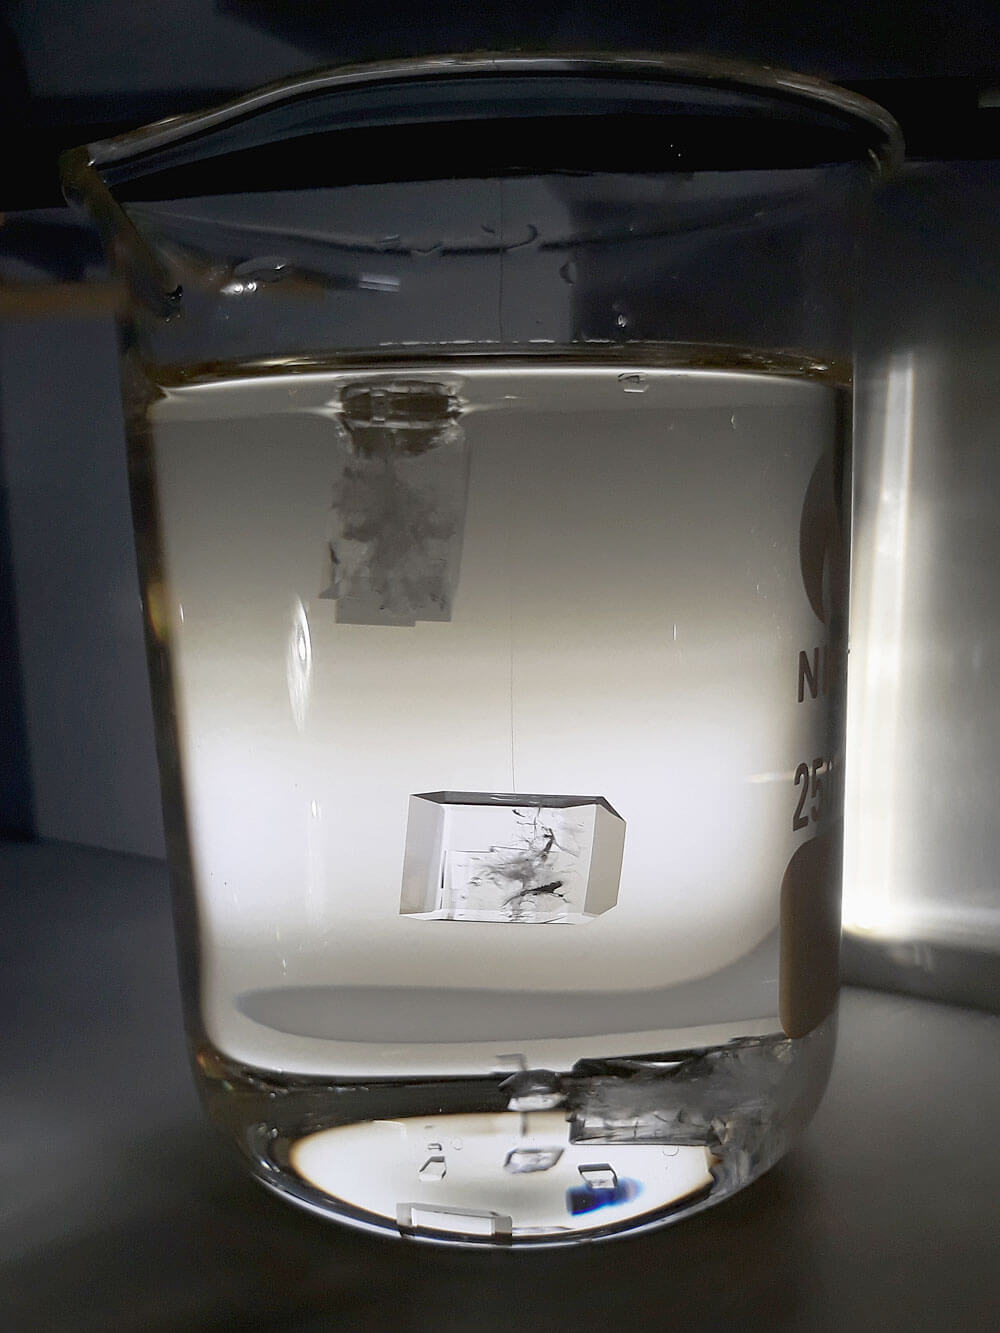
 This is what sugar dust looks like. It sticks to the otherwise transparent crystals and ruins them.
Therefore, here’s a more reliable method to grow a single crystalline gem from sugar.
Again, pour sugar solution into a dish. Make sure that the dish has a flat bottom. But this time, don’t sprinkle any sugar grains inside. Just let it sit somewhere quiet, like the basement, or the inside of a drawer.
Also, shield it from air movement (like the fan). If air constantly flows on the surface of the solution, it will cause crust to form on top, which is not what we want.
Eventually, small hexagonal crystals will start forming on the surface. How long it takes for them to appear depends a lot on luck – sometimes they pop up within 2 days, occasionally it can take 1 week.
 Observe the small hexagonal crystal that formed in the middle of the dish.
Once you see a single crystal appear, use a spoon to scoop up some sugar solution, and drip it on top of the crystal to make it sink to the bottom. Note that by dripping solution on top to sink the crystal, we do not directly touch the crystal; thus, no crystalline dust will form.
We want to sink the sugar crystal because single crystals that grow on the surface will develop hollow cavities on the side facing up, which isn’t very nice.
After that, close the container/completely seal the dish with some plastic wrap. Sealing it this way will prevent further crystals from forming. This allows the single beautiful crystal to grow in isolation.
Since there are no other crystals around to compete with it, this crystal will grow faster than individual crystals in Parts 1 and 2.
Here’s the crystal after 1 week:
 After 1 month:
 Even though I sealed the dish, 2 other crystals also decided to form. But since they didn’t interfere with the growth of my original crystal, I just let them stay there. Besides, they looked quite pretty.
 Like before, once you’re satisfied with their growth, you can take them out and dry them with a paper towel.
And that’s how you grow a transparent gem out of sugar!
Troubleshooting & FAQ
Growing sugar crystals is quite straightforward. However, in the event that you run into some complications, here’s how to fix them.
-
Why did a fine sugar dust form in the solution?
Maybe it’s because you touched the crystals inside the supersaturated solution, shook them around, or hit the crystal hanging on the string against something. Unlike other crystals, sugar dust forms extremely easily – which is why my procedure in parts 2 and 3 above do not require you to touch the crystal in any way.
If the dust has already formed, you need to reheat the solution to get rid of it.
-
Why did a layer of sugar crust form on the surface of the solution?
 Sugar crust forms on the surface of the solution when the it evaporates too quickly due to excessive air movement. This is why I always recommend that you partially cover the top of the container with a lid, plastic wrap, or foil.
-
Why are my crystals growing so slowly?
It takes some time for big sugar crystals to grow. Plus, crystals that grow more slowly are clearer and higher in quality.
Nevertheless, if you want to speed up the process, increase the ratio of sugar to water at the start, from 3:1 to 3.5:1.
-
Can I use other types of sugar (cane sugar, brown sugar, etc.)?
There are a huge variety of sugars in the market. Granulated sugar, castor sugar and icing sugar are actually the same, they just come in different particle sizes. These sugars are white in color, which means they are relatively pure and good for crystal growing.
Cane sugar and brown sugar are less refined. You can also grow crystals from them, but the crystals will be yellow or brown.
Basically, you want to make sure that the sugar you use mainly consists of sucrose. Hence, maple syrup can be used (many people have observed crystals forming in their syrup by accident). But don’t use sugars like honey, which contains not sucrose, but fructose and glucose.
-
Are the crystals stable?
Yes. Once you dry them properly, you can keep sugar crystals for a long time.
-
Can the crystals be used for jewelry?
Nope. Sugar crystals are brittle and dissolve in water. I suppose you could seal one in epoxy, but I don’t think the effect will be very nice.
-
What other crystals can I grow?
It’s amazing just how many different types of crystals you can grow at home. If you’re new to crystal growing, I recommend growing crystals from alum (used in baking) and monoammonium phosphate, a type of fertilizer.
Both are non-toxic and grow fast.
***
That’s all for this guide. If you have any questions, feel free to leave a comment below.
And if you manage to grow some crystals, do share them with me! Doesn’t matter if it’s a science fair, a hobby project or something else. I’d love to feature them on this website. I’m planning to create a new page showcasing crystals that others have grown.
As always, happy growing!
I call this one diabetes
Hey, I’m really impressed by what you do and how clearly you explain your process. Once my exams are over, I’d love to try growing some crystals myself.
I also had a question: have you ever tried making giant crystals using KNO₃? I recently recrystallized some KNO₃ to obtain a purer batch, and seeing how easy the process was made me wonder just how large the crystals can grow.
Nope, I’ve never grown potassium nitrate crystals before. I have heard that they are quite easy to grow, but I’m not sure whether it’ll be much more difficult to get large, high quality specimens. Give it a try and let me know how it goes!
Can I just make a solution, partially cool it, and then drop a single sugar crystal (from the bag from the store) onto the top, then sink it to kickstart the single crystal formation? I keep getting bottom nucleation, and also my top crust forms before the solution cools completely, despite having it covered completely, and despite dripping water on the top to prevent it. Thanks!
Since you’re getting bottom nucleation and lots of top crust, it might be that your solution is too supersaturated. Perhaps your room temperature is colder than mine, in which cause you should add ~5% less sugar.
Anyway, yes, you can try dropping a single grain of sugar on the top to kickstart nucleation. But usually you can’t pick out a single grain nicely; you’ll also get a bunch of dust sticking to it, which will cause lots of tiny crystals to form. So before you put your grain into the solution, wet it with a single drop of water for a few seconds. The water will dissolve the sugar dust, but will not be enough to dissolve the main grain.
I don’t have fishing line, but could i also use another similar material like dental floss?
Sure. Thread, string, dental floss, all of them will do.
Also, I wanted to ask if you have ever worked with aluminum sulfate (not alum). I’m trying to grow crystals from it, but I haven’t been able to find much information or get good results so far.
Thank you again for sharing your work — it’s been really helpful.
Best regards,
Sofia
Yes, I’ve tried it. Aluminium sulfate does not form nice crystals.
Does potassium dichromate or sodium dichromate make nice crystal
Yes, the crystals are orange and very beautiful indeed: https://en.crystalls.info/Potassium_dichromate
However, the compound is very toxic and carcinogenic, so I highly discourage trying.
Will a chunky sugar crystal still grow if I use twine instead of fishing line?
Twine is a lot rougher than fishing line. That roughness encourages extra crystals to form around the main crystal. In short, yes, it’s possible, but harder.
Hi, I love your tutorial on the three methods for making sugar crystals. I too loved doing this in my youth and even once for Science Fair. Have you tried Copper Sulphate crystals, they are beautiful, and blue. I tried doing Copper Sulphate, and Salt crystals together and it caused the nail I suspended in my jar to bubble immediately and oxidate really fast! I’m 51 now, and thanks for renewing my excitement in this gem of an art!
Hey, happy that you enjoyed it 🙂 Yep, I’ve tried copper sulfate too; in fact they were one of the first crystals that I grew in chemistry class. I also wrote an article about it here: https://crystalverse.com/best-way-to-grow-copper-sulfate-crystals/
Hi Chase,
First of all, thank you so much for your blog — it’s exactly what I needed. Your explanations are really clear, and they helped me understand the process much better.
I’m currently trying to grow a sugar monocystal following your method. I started with a ratio of about 2.7:1 (sugar to water), and after around 3 days I already had several small crystals forming at the bottom of the container.
Then I tried using a 3:1 ratio as you suggested, but my solution became extremely supersaturated. When heating it, I could still see undissolved sugar even before it started to boil, which made me unsure if I was doing it correctly.
In your examples, when you obtained a crystal forming at the surface, it looked like there were no crystals forming at the bottom. Is that correct? Do you have any advice on how to avoid bottom nucleation and favor a single crystal instead?
It might be because your room temperature is colder than mine. Hence, you need to dissolve slightly less sugar than me. Just dilute the solution with a bit more water, warm it to dissolve the existing crystals, and wait a bit more. Also partially cover the top to reduce air movement.
If you want to grow a single crystal, bottom nucleation actually isn’t a problem. The problem occurs if you try to pry it off the bottom to tie it to a string. If the bottom crystal is well isolated and no other crystals threaten to stick to it, just let it grow by itself.
Hi Chase!
I’m on my 3rd round of prep! My 1st wasn’t saturated enough and the sugar crystals were melting. The 2nd (current) seems to have created solid crystals all over the jar. I think it’s a mixture of oversaturation and the stick being too close to the bottom.
What I’m wondering is, can you reheat the solution and add additional water?
Also is there a more scientific way to measure saturation?
Is your water classed as hard or soft? We have soft to very soft and wondered if the mineral composition plays a part?
Sorry for all the questions – spot the neurodivergent person! 😁
Yes, feel free to reheat, add more water and try again.
You can check solubility charts online and match it with your room temperature. Or you can repeatedly bisect the amount of sugar used per 100mL of water, to “hone in” on the right concentration.
Small mineral differences in water shouldn’t have a big effect on crystal growth.
is it ok if the solution for the rock candy gets moved around? will it affect crystal growth at all? thank you!
Yes it’s fine. Just don’t shake it around too much, or place it somewhere that’s much hotter, or has a lot more air movement.
thank you! that’s a relief.
i actually started growing the rock candy today, which was very exciting- but uh i also found out that the sugar that was put on the sticks to start the crystal growth immediately floated off when i put the sticks into the syrup.
do you think this will become a terribly big problem? thanks again! i think it’s really cool how you take the time to answer so many comments :O
No, that’s fine. It just means that the crystals that grow on the stick might not be so evenly distributed. Next time, you can coat the sticks with some sticky solution, sprinkle the sugar grains and wait for them to dry and get stuck before immersion.
I am trying to prepare a large batch for a group of students. I was planning to prepare the batch, take it off heat / transport to the meeting location, then subdivide into individual containers once it cooled, and insert the skewers. The students would then need to transport the containers home so they could observe the growth.
Is that too much handling or worth an attempt?
That sounds about right. Are the skewers pre-coated with sugar and then inserted before you give it to them?
I’d also recommend subdividing the sugar solution into individual containers while it is still warm (but not hot), to reduce the risk of sugar crust and crystals directly forming inside the individual containers due to dust etc. during the transfer process.
Hey, I’m working on this as a high school project for a food Science class, and I’m just wondering what might be different if I used powdered sugar instead of fine sugar, the solution itself seems fine, if not slightly cloudier, but may this cause any other problems?
You can absolutely use either type of sugar, since they are made of the same compound: sucrose. The cloudy solution might be due to impurities. In any case, it shouldn’t cause any problems.
I had drip filtered it, do you think that may have helped filter out some of the antibinding cellulose, it never turned into a full syrup either, so what should I do.
Is there a problem? Just sprinkle some small grains of sugar into the solution and see whether they grow.
What syrup do you use for the sugar crystals?
The syrup you get by dissolving lots of regular white table sugar in water
This is a picture of my setup. Do you think that this would work, or would the crystals not grow on the rock?
hi dear
The problem I have with my rock candy is that my product is brittle and breaks with a little force. I would appreciate it if you could guide me on this matter.
Rock candy (crystallized sugar) is inherently brittle. There’s nothing you can do about it.
I’ve been working with huge vats of sugar solution and I thought I’ve finally gotten the knack for ratio and temperature; but a recent batch has thrown me for a loop. It’s significantly thicker than my other batches; almost like American pancake syrup. It’s shown no signs of “accidental” crystal clusters during the cooling process, and I don’t think I let it boil for more than a few seconds…
How will I be able to tell if the solution has caramelised? If it has, will mixing it with a properly made solution render them both useless?
This page has become my bible; thanks so much for making it!
Hey. Caramelized sugar solutions are usually much thicker – as you’ve experienced. They are also brown instead of golden yellow. Mixing small quantities of it with a properly made solution is okay, but add too much and it will ruin the batch. Glad you liked the guide 🙂
I would like to make sheets of crystals, almost like sheets of amethyst. Is this possible and if so what crystal recipe would you recommend? I see people making them in jars but I need a large area of them for a project. Thanks
Pour a ~5cm thick layer of the saturated sugar solution on a large tray, and then sprinkle a pinch of sugar on the solution to kickstart crystal growth.
Thank you, I’ll give it a go
try borax and add food coloring for the desired effect
Hello,
I made the sugar solution like you said, covered it with a lid and it still created a large crust on the surface. Do you know why this happened and how I can prevent it?
Add a few drops of regular tap water on the surface. This should prevent the crust from forming.
Hello. I am doing this for my 7th grade science project. In my project I am to make two crystals under different variables. The variables I have chosen are: Dark/shady environment and light/sunny environment. I have two questions.
I have a limited supply of sugar, so I used 3 cups of sugar and 1 cup of water to make two crystals. (I divided up the solution after it cooled) So will it be enough? I am worried that the mixture is too shallow in the container and will not promote crystal growth.
Also, will the crystal in the lighted environment have any growth at all? It is not a problem if it is smaller, but I don’t want to possibly make a crystal with defects or even not have a crystal at all. Thank you in advance.
Hello there. If you did the steps correctly, the crystals should form regardless of how shallow the solution is. But if your solution is too shallow, you can’t grow big crystals, because crystals can only form *under* the solution – so once they reach the surface, they stop growing.
Light intensity should not affect crystal growth. But you might still see a difference in the light/sunny environment vs dark/shady environment. Can you guess why? It’ll make your teacher proud 🙂
Anyway, good luck for your project!
Hello chase
Something really weird is happening when I am making the cluster crystals, everyday when I check on them it has formed a deposit at the bottom. I have changed jars 3 times already but it keeps forming what do you think I should do ?
The solution is still too saturated, and the process of changing jars keeps introducing nucleation sites. Let the whole jar sit for 1 week, then change again, making sure that no crust or sugar dust drops into the new jar.
Hey chase. Another quick query from Group 2!🤗
Our crystals did NOT form🙁 We are very disappointed. We’re just wondering if it is because of not adding enough sugar to the water or maybe the jar we stored them in? The water was not completely yellow when we added in the stick with sugar. In our 15ml dish, a hard crust formed over the top and underneath just became a syrup. Is it us?
Thanks so much, this experiment was so fun.
sincerely,
Group 2!🙂
You didn’t add enough sugar (not saturated). Just dissolve more and try again 🙂
Hello Chase, in part 3 how do you remove the crystal from the container without breakage? In part 1, I found that the crystals are stuck to the glass. And thank you for sharing this hobby of yours.
They do get stuck quite firmly. Pushing the crystal horizontally along the surface might help. If you’re still having trouble, consider putting a thin sheet of plastic inside the glass, so the crystals grow on the plastic sheet instead. Then, you can bend the plastic sheet to pop the crystals off.
Hello chase I was doing the cluster crystals and my solution is more white then your orange solution in your picture what should I do?
How yellow/orange/brown the solution is depends on the purity of the sugar that you use. As long as you’re using table sugar (sucrose), and added the right amount by weight, you’re good.
Pour the solution out of the glass (you don’t need to bee too thorough), invert the glass, then heat it — for example, by putting it in the sink upside down and pouring hot water on top (the crystals should remain safely inside). Glass and sugar expand differently, so the crystals will come off much more easily.
Hi Chase,
I just checked on my experiment after leaving it over night for the crystals to cling to the fishing line (i’m doing the cluster one) and the whole top layer of my solution is completely crusted; I can’t even pull the line out. And my leftover solution that is in the sealed jar is clear on the top half but the bottom kinda looks like solid sugar or something, even though it was completely clear last night. What happened and what should I do now? This is due in two weeks 🙁
The solution is too saturated (you added too much sugar). Try to dissolve about 10% less sugar next time. Alternatively, you can also dissolve the sugar crust + remaining syrup in 20% more hot water. Then try again.
Note that depending on the temperature at your place, the amount of sugar you need to dissolve might change. A colder room temperature you should dissolve less sugar, because its solubility is lower.
Hi Chase,
What’s the recommended amount of time to keep chunky sugar crystals in the shade? I was wondering how long you kept it for the final photo of the chunky sugar crystal tutorial.
Thank you!
About 2 weeks. Actually there’s no recommended amount of time. The longer you leave it inside, the larger the crystal will grow.
Simple question: how do you properly dry chunky sugar crystals?
Place them on a paper towel for a few minutes to soak up most of the syrup, then pat dry the remaining syrup.
Hi Chase,
This is really awesome! I have a dumb question though.
When there are multiple crystal forming on the bottom of the container I cannot clean them because they will chip and release “dust”.
Then how can I harvest any crystal ever? If I try to harvest any crystal, it will chip too?
Harvest the crystal only when you’re satisfied with its size, that is, when you want to stop growing it.
doin this for science fair prolly gon mess it up
Have faith, good luck!!
Can I use this in cakes ??
Well, they’re technically edible – but don’t blame me if someone breaks their tooth lol
I have tried 2 times but both times the nylon line got crystal deposit on all of its area under the soln so Im not getting a single crystal but a big clump.
Can I add colors in solution to make color full crystals?
Yes. You’ll have to add a lot though, as the crystals aren’t easily colored.
Wow I never knew we could make rock candy at home I thought it was just made in factories.
Thanks chase for inspiring me to learn science and I’m a sixth grader well I hope you have a good day hope you gat the reply. Please send more totorials bye😁
Now you know 🙂
Have fun, and stay curious!
Wow. This is such clear and straightforward information. Thank you.
me too lol
Thank you for the tutorial! It was really easy to follow as a beginner. I was wondering if you can make borax crystals using this method? I want to try with sugar first to practice but would like to have crystal I can keep.
I’m glad you found it useful! Yes, borax works. However, the ratio of borax vs water will be different. It’s about 1 cup borax per 3 cups water. Good luck!
Hi Chase,
I am helping my son make crystals for a science fair project and after 24 hrs the sugar in the solution has settled in the lower 2/3 of the jar. The top 1/3 is transparent and looks like the pictures you’ve shown. The rest is almost solidified.
The solution in the dish with the fishing line is also very think and seems to have solidified.
Is it time to start over?
Looks like your solution was *too* saturated, so there was a huge excess of sugar inside that deposited as crystals, forming a very thick layer. Try using slightly less sugar next time.
If you have a lot of solution leftover, then just decant the solution to a new container and use this new solution to grow. If there’s not much left, then you’ll have to repeat the procedure.
I’m not sure why, I know my solution is sufficiently saturated… but my sugar crystals (making the second project) are taking forever to grow. Admittedly, I have a lot of crystals on the end of my string (far more than the 4-5 you have.), and I was wondering if that affects growth time.
Yes, the more crystals you have, the slower each of them grows on average. This problem gets worse if there are lots of crystals on the bottom that compete with those on the string. Try decanting the sugar solution into a new container, and move only the crystals on the string to the new container.
I tried to use distilled water and Fiji mineral water to make sugar crystal. I thought that the distilled water would make the largest, because it has no impurities. I found that the mineral water (Fiji) made almost the same size, sometimes slightly bigger. What would be the cause of this? any ideas?
In general, sugar crystals aren’t very sensitive to the type of water you use. Therefore, the size difference that you noticed is likely not due to the type of water you used, but random chance or fluctuations in either the crystal nucleation or the environment – stuff that’s hard to control.
Hi Chase! I will be making this experiment with 27 kids. Is 1 cup of water and 3 cups of sugar enough for one child? or will that ratio work for 2 kids? I am asking my kids to bring a 12-14oz mason jar, so each one can have their own skewer crystal.
Thank you!!!
Hello. 1 cup water and 3 cups sugar is enough for one person (it’s actually a bit more ~ but it’s always good to have a little extra on hand).
Hello Chase! My problem is this: I was trying to make the big, single crystal. After I prepared the supersaturared solution, I colored it and put it on a quiet drawer we never use. After a couple of days, I’ve found out not only a sugar crust has formed on top of the solution, but also hard sugar deposits are forming on the bottom! If I understood correctly, you only cover the solution with a lid or something else once the first small crystal has formed, right? Or maybe I should do it from the beginning, once the solution has cooled down? What about the hard sugar deposits on the bottom? I’m very confused 🙁
Hello. Don’t worry, it’s normal for the crust to form. This can happen when the air is too dry, or there is a lot of air movement. And once the crust forms, it might sink to form those deposits at the bottom. You can try reheating the solution to dissolve the crust, add then add a tiny bit of plain water at the top (without stirring) so that the surface will not become too saturated too quickly. This should discourage crust from forming.
Cover the solution with the lid while it is still hot. The hot water vapor will dissolve unwanted crust. Wait a day or so before reopening the lid to enable evaporation, and thus allow fewer, but better individual seed crystals form.
Hello, what do i do with the extra solution while i wait for my crystal to form?
Just leave it tightly sealed in a jar to prevent stray crystals from forming.
Hi Chase! Love your site. We’re working on a science fair project and want to try your method exactly. You don’t specify if you bring the solution to a boil. Should we or shouldn’t we?
Thanks! The main point is to dissolve all the sugar. Whether or not the water boils doesn’t matter, though it might dissolve a bit faster in boiling water.
Idk, I let it froth (boil) and at the end, the sugar syrup was too thick. It formed a crust very quickly, probably because it was too saturated. I boiled off the water, let the sugar cool and re-added the water. The syrup was much thinner, and I was able to grow crystals. You should probably keep the heat low.
that’s what I’m going for sciences fair and it look nice and really cool
Good luck and have fun 🙂
Hey! Can I add a bit of look aid powder for flavor ?
Yup, sure.
Hi! If I don’t have fishing wire, could I use thread or string?
Thanks!
Sure. Expect more crystals to stick on the thread, because it has a rougher surface. It’s perfect for making crystal clusters, but not so great if you want to grow single crystals.
good but all your “how to’s” are hard to understand. how ’bout making them easier to read?
I have tried making them as easy to read as possible. Any suggestions?
Your instructions are fine. I think he is lazy… 🤷
😂
Hey Chase! Come from the Reddit! Amazing work! Is there anyway to make crystals form that are not hexagonal without using a fishing wire? Also what happens if you introduce a single sugar crystal of your desired shape into the solution. Is there anyway to do that without creating Sugar Dust?
Thanks! At the bottom of the solution, there’s basically two orientations in which the sugar crystals will form. One of them looks flat and rectangular, and the other one looks hexagonal. If you use a fishing wire, you get a crystal that is well formed on both orientations, which means that if you look at a crystal that looks rectangular from another angle, it will look like a hexagon.
Yes, you can introduce a single sugar crystal into the solution. However, it must be done without any physical contact to prevent sugar dust from forming. Try scooping some solution containing a small sugar crystal floating at the top, or using a dropper to transfer solution containing a small crystal suspended inside.
There are some special type off sugar, like big grain rock sugar that was already a pretty big single pieces. Can I use that to skip early steps and add one to the solution and grown it instead?
Sure, that works too.
Hello, I covered the lid but there is crust on the surface forming anyways.
If i just manualy remove the crust will it still work ?
If not, is there any other ways to stop crust from forming ?
Don’t physically remove the crust. If you do so, the entire solution will be filled with microscopic sugar dust. Instead, warm the solution to around 70C for 30 minutes. This will get rid of the crust. To prevent new crust from forming, add a few drops of water to the top of the solution (without mixing it evenly), then seal the container. This will dilute the sugar solution on the surface and discourage crust formation.
How do I get one single crystal to grow on the fishing line. I got to the small dish part and a single crystal grew on the bottom so I used a fork to dislodge it and kind of balance it on the fishing line but it never stayed there because the crystal was slowly sinking in the solution while the fishing line slowly ascended in the solution. and the fork movement created crystal dust which encrusted everything. So do i just have to be super patient and have a crystal grow on the line, and if so how do I get rid any extra crystals that grow beside my chosen one on the fishing line?
I try to use a crystal, sometimes 2 crystals to “press down” on the fishing line so that the line doesn’t ascend. If this doesn’t work, you can also purposely make crystal dust, which will form throughout the solution. Wait a few hours for some of the dust to settle; there should still be a good amount of dust in the solution. Then poke the fishing line inside and a few grains of dust should stick to it. Your last option is to just tie a crystal to the line. It won’t be as pretty, but you’ll get results.
Any suggestions insofar as what to do with the leftover solution? Do you reuse it ever by adding it to a new batch?
Yup, that’s exactly what I do.
Thanks for these fantastic instructions! Do you know the ratio of sugar:water by weight? I’m doing this on a large scale with a class.
250 g sugar per 100 mL water. The accuracy is not very important; you just need to be somewhere within that range.
Edit : Shining a light into the solution reveals that they are tiny tiny crystals.
Hi Chase,
I’ve made up a concentrated sugar solution and poured a small amount off into a dish, where I’ve also put some fishing line for the crystals to adhere to.
My problem is with the larger portion of the solution. While it was cooling down in the saucepan (covered with a lid) a crust formed on the surface so I reheated it until the crust melted back into solution.
Once the now-cooled-again solution was poured into a larger jar and covered with cling wrap I can see what looks to be 1000’s of tiny bubbles. Will these affect any subsequent crystal growing, or are they in fact tiny sugar crystals coming back out of solution? Any advice is very much appreciated.
Hey Dave,
The tiny tiny bubbles are just bubbles, and they form in my solutions immediately after pouring/transferring too. They do not interfere with crystal growth and are nothing to worry about. The bubbles will disappear within 1 week.
Edit: The situation changes if they are tiny crystals. Just stick the fishing line into the solution; some of the crystalline dust should stick to the fishing line, and start growing bigger on it.
If you want to grow big single crystals at the bottom of the container instead, you will have to wait 3-4 days for the tiny crystals to get bigger. As they grow, they get heavier and sink to the bottom of the solution, leaving the top pristine. So all you have to do is to decant the sugar solution at the top into a new container to start your growing process.
Hello! How do you prevent mold from growing? I feel like I’ve done crappy version in the past when I was in elementary school (grad school now) but I feel like I always ended up with mold too
Nevermind! I’ve found my answer in another comment–just wasn’t patient enough. I guess my childhood versions weren’t hypertonic enough, so I’ll make sure I make a really strong concentration this time around 😁
Are these lolipops safe to eat? Won’t water with a ton of sugar grow bacteria very fast?
Yes, they are safe to eat. A highly concentrated sugar solution actually acts as a preservative, *stopping* the growth of bacteria. This is due to something called osmosis, in which the sugar draws the water out of bacteria so that they can no longer grow. People apply sugar as a treatment for wounds, and to preserve food.
Hi Chase,
Stupid question, but is the big crystal from step 3 also safe to eat, even though it’s been sitting in the solution for a few months? I read your comment about the saturated solution acting as a preservative, but doesn’t the fact that a large crystal has formed mean that the solution isn’t as saturated anymore?
1. The crystal is made of pure sugar, so its as safe to eat as any other sugar of the same quantity.
2. Yes, since the large crystal has formed, the solution is less saturated (BUT still above the supersaturation point).
nice work, came from redidit
Hi, fellow Redditor 🙂
This process is so cool. Looks like you have really perfected and worked hard on this.
Thank you! I love what I do, and sharing the process allows me to give others an opportunity to discover a hobby they might like too.
Thanks a lot, I’ve really been looking forward to this
Very cool project.
How can we speed up the process a little bit?
Can’t we play with temperature of the solution while the crystal is forming (particularly in part2 and 3)?
By lowering it the water’s solubility drops and encourages the sugar to form solid particles.
Yeah, you can. Even slight temperature changes will significantly increase the growth rate, which is great if you want to grow them fast. But note that the crystals will also be less clear because of the rapid and usually disorderly growth.