
Copper sulfate is a chemical compound that produces stunning blue crystals. Plus, it’s really easy to grow them. In fact, it’s one of the easiest compounds to grow crystals with.
There are already many guides on growing copper sulfate online. But most of them do not have detailed procedures. Plus, the crystals that they show are usually imperfect.
Therefore, I’ve decided to share my own procedure on growing copper sulfate crystals. It is based on my experience over the past 3 years. And they have given me great results.
Let’s get started.
Growing copper sulfate crystals

Materials
To grow copper sulfate crystals, you’ll need:
- Copper sulfate powder
- Very hot water
- Two large jars
- A flat dish
- A spoon
- A filter funnel
- A thin nylon fishing line
- An electronic balance
Safety
Copper sulfate is frequently used to demonstrate crystallization in high school labs. Like most copper compounds, it is mildly toxic. It’s best to handle copper sulfate with gloves, although touching them occasionally is fine, provided you wash your hands afterwards.
But if you want to grow crystals with children, copper sulfate is not a good idea. They might accidentally eat it, and things can turn nasty. Consider growing other non-toxic crystals such as octahedral alum crystals or star shaped MAP clusters (a type of fertilizer).
Now, let’s decide what type of copper sulfate crystal you want to grow.
Types of copper sulfate crystals
There are 2 types of copper sulfate crystals: single crystals and crystal clusters.
 The procedure to grow them is slightly different. Big single crystals like to grow from exactly saturated solutions which are more stable while crystal clusters grow from less stable, supersaturated solutions.
In this tutorial, we will be focusing on growing big single crystals from a saturated solution. Single crystals are harder to grow, but they are also much more satisfying. Click here if you want to learn how to grow a crystal cluster instead. That guide also covers some FAQ in detail.
This tutorial will be divided into 5 parts:
- Part A: Getting the copper sulfate
- Part B: Preparing the solution
- Part C: Growing the seed crystal
- Part D: Growing the main crystal
- Part E: Drying and storing the crystal
Part A: Getting the copper sulfate
Copper sulfate is a chemical that’s commonly used as a fungicide, rootkiller and drying agent. You might find it in powder/crystalline form at Home Depot or your local gardening store. Alternatively, it is cheap and easy to find online.

The copper sulfate from some sources are purer than others. Try to find ones that look a deep, stunning blue rather than pale or turquoise.
Part B: Preparing the solution

- Dissolve 50-55 g of copper sulfate powder for every 100 ml of very hot, but not boiling water.
- When all the powder has dissolved, your solution should be a clear blue with a slight tinge of purple. If it looks cloudy, it might contain impurities. You can either choose to proceed (results might not be that good), or purify the solution first.
 Left: Impure copper sulfate solution; Right: Pure solution
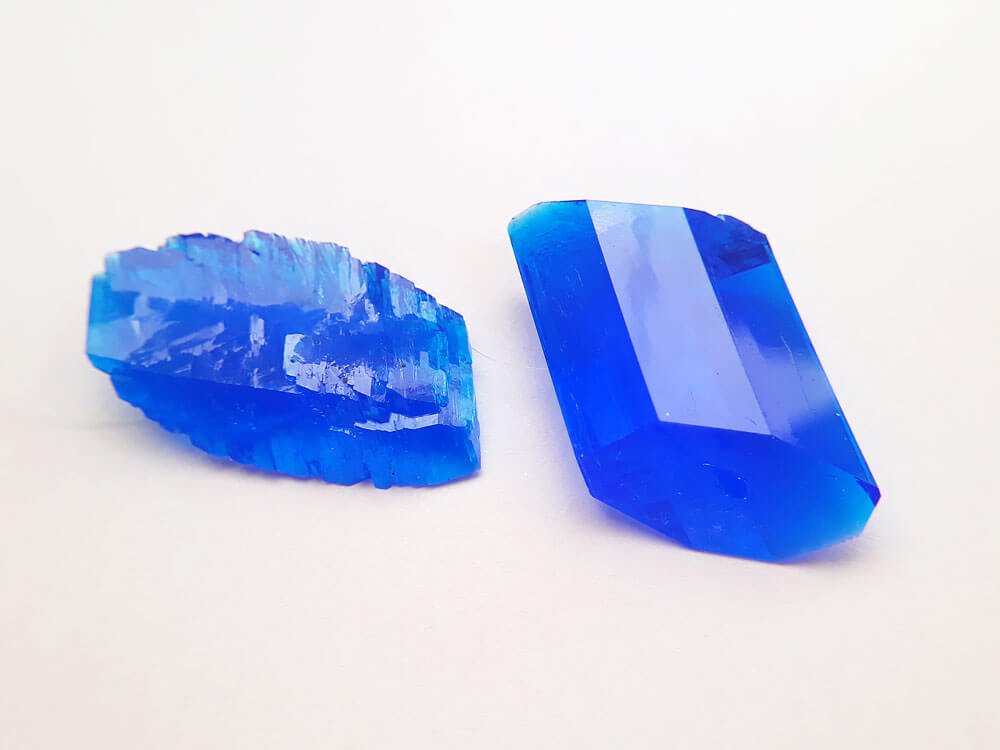 Copper sulfate crystals grown from impure (left) and pure (right) solutions.
- Wait for your solution to cool to room temperature.
- Filter it using (tissue paper/coffee filter/filter papers) if necessary.
- Pour the filtered solution into a jar.
- Sprinkle a few grains of copper sulfate powder inside it.
- Leave the jar to sit overnight.
Explanation
It is difficult to make an exactly saturated solution of copper sulfate. Therefore, in the previous steps, you prepared a slightly supersaturated solution.
By sprinkling some powder into the solution, these grains act as sites to allow crystals to grow, hence “absorbing” the excess copper sulfate in the solution. Missing this step is why most crystals you see online are badly formed.
After 1 day, most of the excess copper sulfate should have been absorbed, and you should have a bunch of crude crystals at the bottom of the jar.
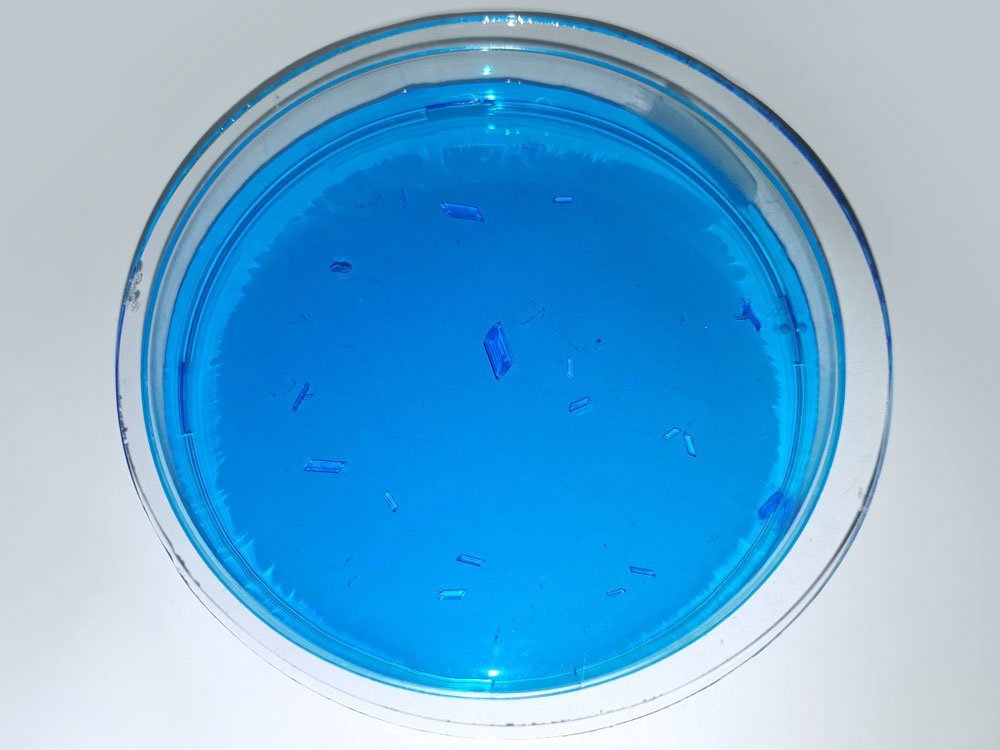
 Pour about 50 ml of the solution into a flat dish. I used a petri dish, but you can use any dish you like, as long as it’s not made of metal.
Pour the remaining solution into a new jar, but leave the crude crystals behind in the old jar. You can re-dissolve them for future projects if you want.
Part C: Growing the seed crystal
Place your dish in an undisturbed location like a cupboard or a shelf in the storeroom. After a day or two, small beautiful crystals will have formed in it.
 Using tweezers, gently remove the most perfect crystal you can find. This step is very important, because the crystal you choose will be the one that you’ll end up with.
Be careful not to scratch it. Then, tie one end of a fishing line to a stick/pencil, and the crystal to the other end. It might be a bit difficult, so try to choose a crystal that’s slightly bigger to ease tying.
 After that, just suspend the crystal in your new jar of growing solution that you prepared earlier.
 Consider tying a few more crystals and letting them grow at the same time. This way, if you accidentally mess up one, there’s still a few around. Regardless, all you have to do now is to leave the jar at an undisturbed location and wait.
Part D: Growing the main crystal
As time passes, the crystals will slowly grow in size. But there’s a golden rule that you need to follow:
The slower crystals grow, the more beautiful they will turn out in the end.
This is because as the solution slowly evaporates, the excess crystal particles arrange themselves in an orderly manner to produce a perfect single crystal. If you let the solution evaporate quickly (like in the sun) or expose it to big temperature changes, this process is disrupted. The arrangement of particles becomes disorderly, and thus, your crystal might become jagged or deformed.
So be patient. Try not to lift them out of the solution. If you want to check on their progress, shine at it with a flashlight.
Also, cover the lid of the jar halfway to slow down evaporation (but not completely stop it). After a week, the crystals should be much bigger:
 After some time, you might also notice that many smaller crystals have started forming at the bottom of the jar. You don’t want this; they compete with the bigger crystals, hence slowing down the growing process.
But don’t try to remove these crystals one by one. Just remove your main crystals, put them aside, decant the solution into a new jar and then place them back inside. This whole process should take less than 1 minute to minimize interruption to their growth.
 Place the crystals aside, while you transfer the solution to a clean jar. This process should take less than 1 minute.
 These leftover crystals at the bottom of the jar do not need to be discarded. Keep them, or recycle for future use.
After about 2 weeks, you should consider separating your crystals. Put each one in an individual container to grow. This way, they will grow faster because they don’t have to compete with each other.
 Given enough solution and a sufficiently big container, you can grow them as large as you like. After 1 month, I decided that mine was big enough and removed it from solution.
Dry the crystal using a paper towel or filter papers. You don’t really need to wipe it, just place it on top of the paper and it’ll soak up the solution. Remember, never wash the copper sulfate crystal, or it’ll re-dissolve. Even a quick rinse will cause the edges to become less sharp.
After that, you’re done! Take it out for some pictures or show it off to your friends.


 Heisenberg would be proud. However, since these are technically minerals, his brother in law would probably be more interested.
Part E: Storing the crystal
Copper sulfate crystals are bright blue because they contain water molecules inside their crystal structure. If left in the open, they might dehydrate, turning white.
 Dehydrated crystals that have lost their sleek, shiny surface. Left alone, they become whiter and the surface flakes off.
To prevent this, you have two options:
- Coat it with a layer of nail polish. The nail polish protects the surface, preventing dehydration.
- Put it in a ziplock bag, then store it in a sealed container together with a little copper sulfate powder. The powder maintains a stable condition inside the container, preventing dehydration.
There you go. The best way to grow single crystals of copper sulfate.
In fact, copper sulfate crystals were the first ones I grew back in my high school chemistry class, and they were what introduced me to this hobby, which I’ve fallen in love with ever since.
I hope you enjoyed the read. If you have any questions, feel free to drop a comment below. I have also compiled a list of frequently asked questions such as:
- How do I grow a crystal cluster instead of a single crystal?
- Will the string get stuck inside the crystal?
- Can I grow copper sulfate crystals on objects like bones?
- Why are there flaws in my crystal?
You can find the answers to all that here.
Or you can also check out this article on how to grow alum crystals, which are both beautiful and safe for kids.
And if you manage to grow some crystals, do share them with me! Doesn’t matter if it’s a science fair, a hobby project or something else. I’d love to feature them on this website. I’m planning to create a new page showcasing crystals that others have grown.
Happy growing!
Hello!
I was wondering about the tying of the crystals and then suspending them.
What knot do i use????
I easily spend the most time trying to just tie the dang thing to a fishing wire!
I also did tie it somehow and then overnight it got loose and dropped to the bottom.
Some help would be appreciated!
I just use a basic overhand knot. Use fishing line that’s as thin as you can find. It’s usually easier to tie crystals to thin lines. If that doesn’t work, you can just try to get the crystal to grow directly on the line. You can see examples of this in my articles on growing sugar or copper acetate crystals.
Hey Chase! I really appreciate your guide, thanks for introducing me to something I feel really passionate about! I wanted to ask a few questions as I do this as a lab for my students. I noticed crystal creep happening really badly, before it would go OUTSIDE the beaker too. I did purify the crystals and now it seems to not be as bad! I do have a few questions. I’ve been doing this for a a little while now. However, I’m unsure if I make a supersaturated solution and cover it, will that solution be able to be used indefinitely for crystal growing? I have been filtering the supersaturated solution and letting it sit overnight, and then I have been using that to grow the crystals. I have enough crystals to make around 3-4 L of solution. I want to grow the single crystal I have in a big jar. What I’m wondering is if I can continuously just filter that 3-4 liters of solution and use that to grow the crystals? My schools heat fluctuates a lot too, and I was thinking that overtime, the solution may no longer be saturated and the crystal will dissolve. Last year I did this, a bunch of nice crystals formed on the bottom of the jar, and I never removed them and just kept the jar covered with small holes. The crystal seemed to grow still even with the crystals on the bottom, but at a certain point the main crystal got jagged. I never actually ended up replacing that solution but it grew pretty big before it stopped, my assumption was at a certain point it was dissolving and recrystallizing making it jagged. This time around I want to remove them and keep the solution clear of any other crystals to reduce nucleation points. I was thinking, that if the jar is left with small holes on the top, it should stay saturated over time because the water evaporates? In short, I’m wondering if I can make the 3-4L of supersaturated solution, filter the solution, grow the crystal for a month or so, and then can I simply remove the crystals from the bottom, refilter the solution and then use that again? Or will I have to remove the crystals from the solution and supersaturate the 3-4L of solution again? I was thinking that I shouldn’t need to if the excess crystals are removed and the system is semi-open, as the water should continuously evaporate and keep the crystals growing because the solution is losing solvent causing the solution to stay saturated and crystallization to continue? The last question I have is about actually preparing the supersaturated solution. You claim to use 55g for 100mL to grow single crystals, it says hot water, but doesn’t specify a temperature. I have tried heating to 50C and 70C. I was wondering if this matters for making the solution, I would assume 70C is what you really want, but I was wondering if there is a specific temperature you try to hit. Thank you so much for reading this, and I look forward to hearing your response! Thank you so much!
Hey Kyle!
If I read correctly you have 3 questions:
1. Dealing with crystal creep.
Yes, using purer copper sulfate does help. Reducing air movement on the surface of the solution also helps, although that would also slow down evaporation and hence crystal growth. There’s not much you can do about it.
2. Preparing a lot of solution, and storing it for future use.
You mentioned that previously, you prepared a lot of solution and some crystals formed inside by accident. In fact, based on my experience, this is actually a very good way to store saturated solution – especially when the temperature fluctuates a lot!
This is because as the temperature fluctuates, the solubility of copper sulfate changes. The crystal inside the solution will “absorb” these fluctuations, growing when the temperature drops, and shrinking when the temperature rises. That’s exactly why you saw those jagged edges (nice observation!). Thus, the solution always remains very close to perfect saturation. This solution can then be used “out of the box” whenever you feel like it. If there are no crystals inside, there is no such buffer, and when you use the solution for future growing attempts, the results will be inconsistent. No need to have any holes in the lid.
Of course, poking holes in the lid is also fine. But I don’t like it because evaporation will cause the volume of your solution to decrease over time.
Also, once you finish growing a crystal, feel free to keep leftover solution. It is perfectly saturated as is, and will last indefinitely when stored properly. No need to supersaturate again. (Optional: You can of course dissolve a bit more copper sulfate to supersaturate it if you want to make the crystals grow quickly in the future).
3. Heat at 50C or 70C?
Both 50 and 70C are fine. The purpose of heating is simply to make the copper sulfate powder dissolve more quickly. Don’t heat it for too long or let it boil though, as this will cause the compound to decompose.
Hi again Chase! Thanks so much for the response. It was helpful and gave me insight into what I had suspected!
One thing I’m still pretty unclear about that I wanted to clarify. Figured I’d explain a little more of my setup. I have a crystal right now that is pretty big, and doesn’t fit in my 2,000 mL beakers anymore.
My goal is to grow the crystal as much as I can until I do the lab next time, which would be 11 months. I wanted to put that bigger crystal into a jar and to fill it, I need 4L of solution to the top.
Last year I did this, it was in this jar, I poked 4 pencil sized holes in it and just left it there. Never filtered it or changed the solution ever. But it seemed like at a certain point the crystal just wasn’t getting bigger and just started looking a little jagged. That’s when I noticed how many large crystal clusters had formed at the bottom as well.
This year, I was thinking what I would have to do to keep the crystal growing is to remove the excess crystals that will form on the bottom of the jar and filter the solution in there every once and while.
However, I’m worried that if I remove the crystals at the bottom of the jar and filter the solution, then put that same solution back into the jar with only my main crystal inside, that the main crystal will dissolve instead of grow. As I understand, with the temperature changes in my school, that might happen if there aren’t excess crystals @ the bottom, but I don’t want them competing with the growth of my main crystal, so I figured removing them would be the way to combat that issue.
What I’m asking is if I remove the excess crystals, and filter the solution, would that solution still be saturated for growing the crystal again in the same jar?
or
Would the solution need to be supersaturated again, cooled back down to room temp undisturbed for a day before I can put it back in the jar?
Also you said there isn’t any need for the holes? Are you recommending I just cover it entirely? I thought it would need to be open to air but to promote crystal growth, because if not evaporation won’t occur? As little as possible to slow the evaporation rate, would in theory make a more structured crystal. But if it is covered for 11 months, won’t it just stop growing if covered?
I was hoping you could give me some advice to help aid my setup. Thanks so much again!!
I see. It’s fine to remove the small crystals and put the filtered solution back into the jar with the main crystal. Since it’s very big, and has survived multiple temperature changes in the past (with the other crystals alongside it), I don’t think that it will suddenly dissolve. Sure, it might get a bit smaller, but once the temperature drops it will return to normal and grow.
If you want to be super sure, you can supersaturate the solution by evaporating ~20 mL of solution and let it cool before transferring the main crystal back.
Yes, you will need holes. I must have misunderstood you earlier.
Hello! The last couple of times I have attempted to grow crystals, the seed crystal keeps dissolving. My solution is saturated with precipitate on the bottom, and I filtered it. Thoughts on what I need to do differently?
If the seed crystal dissolves, it is impossible that the solution is saturated. Are you sure the precipitate consists of crystals, or just insoluble impurities? If they are impurities, filter them out, evaporate some more water, and try again.
Another possibility is that your solution is not well-mixed, so it is undersaturated at the top, and saturated at the bottom. In this case, stir it around a bit.
Hi! I am Japanese so my English is maybe bad.(lol)
Your copper sulfate crystals looks very good!
If I grow that crystal at the bottom of the beaker, is there anything point that is advice?
Sure, you can grow them at the bottom of the beaker too. But note that the crystals will be flatter the side in contact with the beaker.
Also, if you want to grow large single crystals, it’s much more important to get the concentration right (not too supersaturated). Otherwise, lots of small crystals will form and stick to your main crystal.
What temperature should it be?
For growing the crystal, any temperature between 5-35 Celsius will do.
Oh! You’re Japanese! Me too! lol
Hi Chase!
Awesome guide!
I have a question about seeding, though 🙂
The first time, everything went smoothly, but this time, instead of getting separate single crystals, many small ones form and overlap…
I should point out that the solution is pure and I let it rest for 2 days, filtered it, transferred it to another jar, and then poured the 50 ml into the petri dish.
The room temperature is around 25°C…
What can I do?
Even though you let the solution rest for 2 days, it might still be slightly supersaturated. No worries. Either 1) wait a few more days, or 2) reheat it and add a tiny bit of water (2% of the total volume). Wait for it to cool, then try again.
Do I put the lid on the jar of my first solution that ha a few grains of copper sulfate in it?
That’s helpful, but not strictly necessary.
Hi! Stunning crystals, I want to grow one myself but have some concerns. Should I be worried about it’s toxicity while the crystal grows? Can I do it in my room or do I need to put the solution in a separate one? Thanks!
Copper sulfate is an irritant on skin contact, and toxic when consumed. But it creates no fumes, so simply putting the solution in your room is perfectly safe (unless there are children or pets around – for obvious reasons).
I filtered my solution many times but I always keep seeing like a light blue powder that precipitates every time, does that affect the crystal’s growth?
Your solution might be slightly alkaline due to certain impurities. The powder is likely a mix of copper carbonates and hydroxides. They might slightly interfere with crystal growth, and in any case, they don’t look nice.
To fix this, try adding a few drops of dilute sulfuric acid. It should immediately dissolve the precipitate.
This is really cool. I might give it a go with my daughter! Thanks for sharing this on reddit.
Have some good memories! And make sure she knows you can’t eat it.
Yes, absolutely! 😀
hello!
You mentioned that its slightly toxic and shoundnt be stored with food. How do you then actually store it in the fridge?
Also is there alternative to using a fishing line?
Thanks!
You don’t have to store them inside a fridge, a sealed container would do.
Thread can be used in place of fishing line, but crystals like to form and crawl up the thread. Alternatively, just grow the crystals at the bottom of the container.
Chase i dont get it to coat it with nailpolish? are there transparent nailpolishes(those are colourful right) cause i dont want to mess with the colour and i want to store it in open so badly that i cant airtight them any help regarding what this nailpolishing is. please help.
Yes, coating it with transparent nail polish will work. Make sure that every part of the crystal is coated evenly.
How often do I have to apply the nail polish to the crystal? Or is once enough forever?
Once is enough forever.
Thanks for this info!!
Yes, most nail polishes are colorful. To seal in the polish on a fingernail, reducing chips and wear, there’s a product called a “top coat polish” that’s clear. This is what you’d use. No need to hide the magnificent color of the crystal!
Some fantastic info here Chase, really appreciate the effort you’ve put into sharing it with us. One tip that has worked well for me that you might like to try…
I’m lacking dexterity (and patience !) so rather than hopelessly fiddling with trying to tie a tiny seed crystal onto my fishing line, I’ve found that a microscopic dot of cyanoacrylate glue (superglue / crazy glue) on the very tip of the line is a quick, simple and very effective way of attaching the crystal, and when you’re done a gentle tug will usually remove the line without a trace. Also tried the same technique with a long hair which worked well, though that’s getting back into ‘fiddly’ territory again !
It doesn’t seem to affect crystal growth at all, though have only tried it with CuSO4 so far… planning to try some of the other materials on your site when time and space allow.
Great. That’s a tip everyone can use. Thanks for sharing!
This is by far the best practical guide I have come across in my quest to grow Copper Sulfate crystals. I wish I had come across it before. I grew a magnificent poly crystal but am going back to try for a third time to get a single chonky (yes I said chonky lol) crystal. Apparently my solution was mega saturated. I also disintegrated or redissolved several of my fine seed xtals by not letting the solution cool enough first. That hurt but lesson learned haha. Thank you, Chase, for you information and enthusiasm. I wish you the best in crystal growing, academia, and life.
Thanks. Good luck for your chonky crystal, and may your path lead you wherever you want to go. Have a good one!
Hello
Thanks so much
I just bought the copper sulphate today and was wondering how to do it.
Do you have any tips for table salt crystals because mine always end up small and ugly
Table salt crystals grow the best when they are undisturbed. Try preparing a saturated salt solution, add a bit (2-3%) of distilled water to dilute it, and then leave it in the storeroom/basement. Sometimes my best crystals form when I start growing them, forget about them for a few months, and come back to see amazing crystals.
You can also check out my guide on how to grow table salt crystals: https://crystalverse.com/sodium-chloride-crystals/
Hello, thank you for taking the time to produce this detailed information. Once the crystals are formed are they then safe to touch?
Copper sulfate crystals are mildly toxic. You can touch them, but be sure to wash your hands afterwards. If you coat them with a layer of nail polish, then they are safe to touch.
Hey chase I was just wondering.In one of the steps you said filter is necessary how do I know if it’s necessary to filter it?
Actually you don’t need to filter the solution ~ it’s just that filtering it will make it easier to grow good crystals. I always filter my solutions unless they look perfectly clear from the start.
Hey Chase, how many crystals should be growing on the bottom of my Petri dish? In your pic it looks like they’re just a few, but I have a lot more, almost like a sheet. Don’t get me wrong there’s some good seeds in there but is my mixture evaporating too quickly?
It’s more likely that your solution was slightly too saturated. This is a very common problem. Next time, if you face the same problem, add a few drops of plain water into the solution to dilute it. After that, fewer crystals will form.
As long as it doesn’t prevent you from getting good seeds for tying, you don’t need to worry about it.
Hello! Thank you for the guide!
I was wondering: When you grow the seed crystals on a Petri dish, do you suggest closing the Petri dish with a lid, to isolate dust, etc.? Or would this make evaporation too slow?
Thank you!
On hotter and drier days, I use a lid, while on cooler days I remove the lid. It all depends on your surroundings. If you find that the crystals grow too fast, then use a lid.
Hi, I’m going to try this soon for the first time. I have a question. When you start growing the crystal the nylon thread grows into the crystal, not? Won’t this be ugly in the result?
Yes, the thread grows into the crystal. But since the nylon thread is very thin, it is almost invisible, especially if you cut it away after you are done with growing it.
Thank you, bro. Sorry, no speak English..(
I am very grateful to you for this information in your site.
It’s okay. Good luck!
Fucking awesome, dude!
Thank you, this is great! I tried this in school once, and loved the results. Then I tried something else- and you might find this interesting. So I took Copper Nitrate and reduced it with KOH, which gave a green solution (we speculated it had malachite in it). We tried to crystallize from that solution, but it gave the powdery, sandy residue you mention at the top of your article. Maybe something to try, if you can develop it into a crystal? Would love to hear insights.
Hello. Mixing copper nitrate and potassium hydroxide forms copper hydroxide, which is a blue-green powder. Unlike the residue I mentioned, copper hydroxide is insoluble in water, which means it’s not possible to grow crystals with it in the conventional sense.
Someone on Reddit did manage to make some malachite. He also included his procedure. It’s more like a crust than a shiny crystal, but still impressive imo.
Thanks for a great tutorial.
I have a 10mm crystal that is very nice, can that be grown bigger by adding it into a jar of solution & leaving it.
Yay! Of course, you can keep growing the crystal by putting it in more solution. However, make sure the solution is exactly saturated (an undersaturated solution will cause the crystal to dissolve, a supersaturated solution will cause the crystal to grow quickly and look ugly). To prevent this, prepare a supersaturated solution, sprinkle some crystal seeds inside and wait for several days before decanting the solution and using it to grow your main crystal. Good luck!
Hi! Great guide. I was curious about how I should dispose of any extra solution. Is there a way to separate the still dissolved copper like waiting for most of the water to evaporate or some other way to deal with it?
Hey there. The easiest way is to let all the water evaporate, then you’ll be left with some copper sulfate crystals that can be stored in a small container, ready for use in the future.
If you want to really throw everything away, either contact a waste disposal service, or convert the copper sulfate solution into a form that is less toxic to the environment. The waste disposal service can be expensive, so here’s how you convert the solution. Drop a bunch of iron metal into the copper sulfate solution, and wait a week or two until the solution turns completely green. This is due to a metal displacement reaction in which copper sulfate reacts with iron to form iron sulfate, while copper metal precipitates out. This iron sulfate solution can then be disposed of.
Awesome content! I will definitely follow your work! I was wondering if it’s safe do laser print something in it, like someone’s name so I could gift it to them!
Thank you! Safety side, I think it should be fine. But you might want to try it out on a small crystal first because I’m not entirely sure it will work.
This guide is very helpful. Is there any way to change the colour of the crystal without affecting its growth or shape?
Thanks! No, it’s not possible. Of course, you could look for another compound that has a similar shape but a different color. Manganese (II) sulfate crystals, for example, look similar to copper sulfate crystals but are a light pink.
Do you mix up more solution following the same recipe to make up for the evaporation when trying to grow the big crystals? Or mix up enough to last a month or 2 in the beginning?
It’s better to do a small trial run first. Once I’m sure of the purity of the copper sulfate, then I’ll mix up enough to last a month or 2 in one shot, and store the excess in a big jar.
Is it at all possible to use an already naturally formed crystal to grow more like that crystal? Maybe like an amethyst or plain quartz crystal?
Also just out of curiosity, do gems work in these growing processes?
Most naturally formed crystals, like quartz, form under very high heat and pressure deep in the Earth. While it is technically possible to grow a piece of these crystals, you would need similar conditions to achieve such an effect.
In fact, pure quartz crystals are grown for industrial applications. Rubies and diamonds can also be created in the lab. But unless you have specialized equipment, it would be nearly impossible to grow these “gemstones” at home for the average person.
I’ve recrystalized my copper sulfate following your guide, and realized that my starting material is about 50% anhydrous CuSO4, which meant I added more CuSO4 at the 50g to 100ml ratio. Because of this, I ended up with some rather sizeable crystal clusters that have up to 1 inch crystals in them. To use these crystals for the growing solution, should I grind them up in a mortar & pestle (granite) first, or will they dissolve reasonably fast enough in fresh distilled water?
Also, when you say to “wash” the crystals, are they just being washed with clean water? Won’t that just re-dissolve the crystals?
Nice. The grinding is optional. Just heat the solution for about 15 minutes and the chunks will dissolve. Of course, powder will dissolve in less than 5 minutes, so that’s up to you.
I recommended washing the crystals quickly with cold water. Cold water dissolves the crystals much more slowly, so any loss is negligible. Much more convenient than using an organic solvent.
for organic solvent is acetone ok?
Alcohol would be convenient but i can only get 75% so is that fine
Yep, 75% is fine
I love the fact that your directions are so detailed, and they’ve been very helpful. The problem that I’m experiencing is that I have a hard time growing the little crystals in order to grow them into larger ones.
I follow the directions but end up with a layer of crystalized powder at the bottom of the dish, but no crystals.
What am I doing wrong?
It might be because you rate of evaporation is too fast, or maybe you accidentally scratched the little crystals when you handled them. Try pouring the solution carefully into another container, cover it partly with a lid, and then leave it in an undisturbed area. That should help. Good luck.
Awesome crystals and informative instructions. What happens to the fishing line after the growing process is over? Is it embedded within the crystal or can it be removed?
Thank you. Unfortunately, it is stuck inside the crystal, though barely noticeable. Alternatively, you can grow the crystal at the bottom of the container. In that case, no fishing line will be needed.
Growing copper sulphate crystals is fascinating, and the good thing is if something goes wrong, you can always dissolve everything up and start over again. One interesting thing to try is to suspend the seed crystal into a saturated solution that is very slightly above room temperature. As the solution slowly cools, the solubility decreases, and the crystal grows a bit faster. When you look at the beaker from the side, if the light is right and you are very observant, you might see the liquid moving around the crystal. This is because as the copper sulphate deposits onto the crystal, the solution around the crystal becomes less dense, and it rises and is replaced by denser solution. You can actually see the swirls in the solution. Very neat!
Yup, nice observation! You can even use these swirls to test if a solution is exactly saturated. Just drip a few drops of a solution of unknown concentration into a solution that you know is saturated, if the swirls sink, it’s too concentrated, if they float, then not concentrated enough.